Saturday, October 8, 2016

Scraps ONLY

First of all, Yes---The Coffee Cup photo-to-quilt project is done.  The top---all appliqued.  I LOVE it.  Love, love, love it.  Next up for that is getting the perfect backing, and then quilting it.  So you'll have to wait a bit more.

But in the middle of 4 or 5 other things, I decided I had to make a 'Scraps Only' challenge project that an Instagram group was doing.  So I pushed things aside, and got out my scrap bags.  I have a basket where I toss scraps & I had color sorted those not too long ago, into zip lock bags.  I also have scraps cut up (a la Bonnie Hunter) into 1.5" strips, 2", 2.5", 3" strips.  Those are stored in boxes or bins.  For this project, I only went into the bags of pieces, sorted by color.

Felt a craving to make courthouse steps, was thinking pink & a baby quilt.  But the baby in question is a boy.  And the GREEN scrap bag was pretty big.  To start with.  And the bag of low volume neutrals, mostly creamy backgrounds.  PLUS--it would be OK to start something new if there was an immediate purpose for it, and a quick finish.

Swept everything aside off the cutting table, spent a couple hours cutting 1.5"strips. The next evening, I made sixteen 9" blocks.  That made a top that was 36".  I wanted it more rectangular & decided to add baby's name & year he was born.  I've been working on making some letters for another project, so I could use those.  The letters look like MY writing, which is nice.   I also made a bunch of flying geese in different size, dipped in to the purple scrap bag too.


Two days later, I started quilting it.


Big quilted spiral from the center through all the courthouse step blocks, to the edges, then some special quilting in some other parts of it.


The scary thing about the project was just how much we could actually make out of our scraps.  Not to mention the over-flowing abundance of our actual fabric shelves.  Using scraps is a fun limitation----you must use what is IN the bags, make it work.  I think just from my color sorted bags alone, I could easily make a twin quilt or a couple more baby quilts, at least.  The entire top was scraps, including binding.  I love scrappy & get bored quickly with a more limited selection of fabrics.  Plus, even as pretty as a collection is, it usually seems a little flat without mixing other fabrics in.  How could you express your personality in a quilt without doing some of your own mixing?


  Do you keep your scraps?  How do you sort & store them?

Friday, September 30, 2016

Splendid Sampler Progress

Frankly, I've gotten quite behind on the Splendid Sampler.  Remember those first weeks?  We were so excited.  We just couldn't wait for Sunday and Thursday to come.  Ran to the computer or phone, first thing---is it there yet, is it there?  Print it, run to the sewing room, cut & sew!!!  Pat Sloan told us, calm done, it's not a race!  Oh, if we had just listened!

But then other things came along.  Other projects. Taking our time and attention.  Hey, it's just ONE block a day right?  For 100 days?  I can TOTALLY keep on top of that.  Ha.

Anyway, I digress.  Once a squirrel, always a squirrel!  No use fighting it.  Squirrels got BALANCE!  They can handle it!


Played a little catch up.


Ok, top left.  HATED it.  Not, I don't really care for it.  I found it disturbing.  So I re-did that block.  Much better, right?  Well it makes me happier!


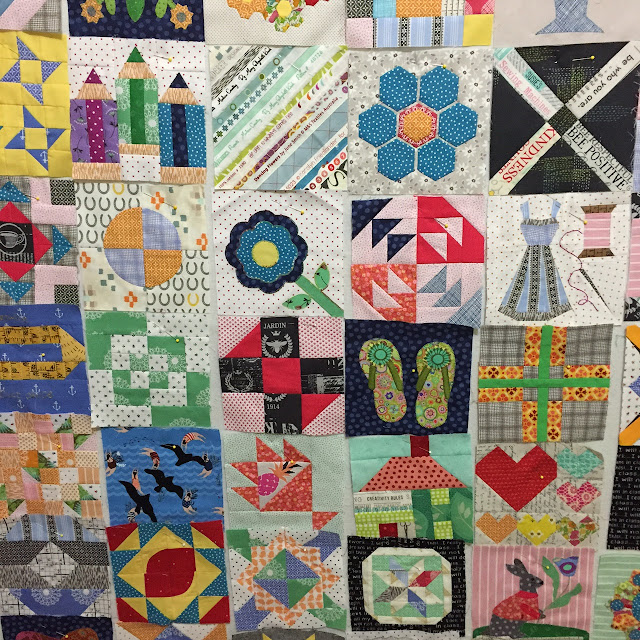
While I was playing catch up, I got all the blocks out & put them up on a design wall.  They hadn't all been together on a wall in a long time!

52 blocks done.  Still behind.......sigh..... but not gonna sweat it.


It's about the road.  Not the destination.

Wednesday, September 21, 2016

Studio Organization takes a HUGE step forward!

Our basement has been getting some finishing done, and our carpenter was going to install some slat wall on a 12' long wall in the laundry room.  2 of his guys came to do it, and I was so jealous of my laundry.  I thought---geez, I've been thinking about that for my studio since wonderful organization expert Mary Dykstra spoke at Great Lakes Heritage Quilters last year.  She has actually organized sewing studios before & knew quite a bit about it.  One of her favorite things is to use either pegboard system or slat wall (her top choice) and get things up on the wall & off the table.  I had debated & then decided slatwall was my first choice.  And some day...some day....Mike and I would get some and hang it.

As they were downstairs working, I thought, hey!  Wait a minute!  I have carpenters doing things for me!  They could get and hang that for me!  No struggling & planning for Mike & I!  Professionals!  Duh.

So I did!  Texted the boss man- Jim, and one of the guys, Chris,  measured before they left.that same day.  Jim Becker , who owns Jobecks Designs, had done our kitchen remodel some years ago.  Just three days later they installed a wall for me that is approximately 5' X 4', big enough to run the length of my cutting wall.  It's all framed in very pretty--I know for sure Mike & I wouldn't/couldn't have done that!

I forgot to take a BEFORE pic when taking everything down in prep, but did find this older pic, which shows at least part of my cutting tables:

 That picture only shows about HALF of the table top.  There was another organizer that held lots more stuff on the far left, not shown.

Took it all down, everything off the top.  All ready!!


Voila!!

Just starting to hang some things up.  Organizing is fun, but messy
Close up, after most of the hanging up was done---there are two of my favorites, the magnetic tool strip & the little compartment bins.  The small plastic buckets are great too

And look---the top is CLEARED for cutting!
I used the wonderful world-wide web to look for products.  Amazon was my chief source.  Home Depot carries some things, but not in the store, and many of those are aimed at garage organizing.  Some of the garage things work, but they tend to be very large hooks, aimed at holding large heavy items, like bikes & hoses, and tools.   

The trick is figuring out what's going to go on the wall, & what's the best way for it to go there.  I did email Mary Dykstra for a few suggestions & she was very helpful.  Things like pencils or marking tools are best in a small container sitting on a shelf.  There are lots of wonderful shelves--I got a set of three 10" long acrylic shelves.  The clear acrylic is wonderful, you can see what's in it (or on it, as they case may be).  I also have a longer shelf, 24" wide, 4" deep, with closed ends, that I put things in near the top, small jars, more decorative things.  A great 6" acrylic square bin holds my perle cottons & embroidery threads.  Stored up top, cuz I don't use them a lot---I can climb once in awhile!

Amazon had as a vendor a place called Retail Resource.  Their quality was very good & they were very fast, so the next time I ordered from them, I ordered directly & saved a little money.

Some of my favorite:  The magnetic tool strip---going to have four of these altogether, remember I am buying for TWO slat walls, the basement & my studio.  It's nice to be able to order more, see how you can use, how well does it suit your purpose.  If I can't use it one place, I can probably use it in the  other.  The magnetic tool strip holds scissors, both for paper & for fabric, drawing compass, & magnetic pincushion.  Plastic bins of different sizes.  Acrylic Magazine rack, although the one I got (not from Retail Resource) had the part that tips into the slat wall come off immediately--dismaying.  I re-glued it & am hoping for the best.  Meanwhile, I am waiting a couple of wire baskets that go in to the slatwall that might be better for patterns or books I want close at hand.  Those little acrylic boxes divided into 4 compartments each--great for small stuff!  The 10" shelves were wonderful.

One of the nice things about slatwall is that you can slide the container over a bit if it's not quite where you want it.  If you want it higher or lower, you do have to take it out & move it.  On pegboard, the item MUST come out all the way and get re-stuck in the proper holes.  That's one of the reasons I liked the slat wall systems better, just tip it in, slide it over.   I worried that it would be hard to GET the things to go in the slat wall, pegboard being maybe more universal.  But it was very easy peasy & there are lots of great products.    Just ask my UPS deliveryman---he's been here a lot lately!!

Best of all, I can move things around as my needs or wants change.  It will be a work in progress.  Wait,  Oh no.  ANOTHER WIP???  But in a good way.

Wednesday, August 31, 2016

New Projects: PROJECT TWO

I had noticed a new QAL (Quilt-Along to the uninitiated) on Instagram.  Quilters (organized by an Australian quilter/blogger, of course) started August 17th.  It's from  Tula Pink's book, City Sampler, which has100 original block designs, 6" finished.  Interested quilters are making & posting just one block per day on each of the days, for 100 days. The idea is to actually sew one block per day, consistently getting in to your sewing room. But obviously you can work ahead if you want to.

There are prizes.  You have to use certain hashtags and follow certain people or sponsors to be eligible, and you MUST post the block the day it's due, in your time zone (even if you sew ahead).  So if you jump in late, like I did, start with the block that's due, post on Instagram as required, each day.  Do your catch-up when you are able, as you can, but if you start at block one and try to catch up, it's just not going to work.  So do as I say-----start current, post & keep current, do the other blocks when you can.   This is good advice for any QAL, and it's what Pat Sloan suggests for The Splendid Sampler.  (Yes, I'm still doing that too!!).

I posted 4 of the 'back' blocks the others had already done in a collage on Instagram---they won't be eligible for prizes anyway, so doing that is far easier.  I do like to share my work, plus, using my OWN hashtag, I can go in and see all blocks I have made in one place, under that hashtag, together.  See Angie's page for all the info, and she has all the dates & hashtags etc, if you care about that and want to jump in, prize eligible.  Angie, the Gnome Angel.

Here are some of mine.  I'm using shot cotton solids, and the Fibs & Fairytales Collection by Anna Marie Horner.  It was all tied up in a bundle,  and wanted to go FREE! So I let it loose.

Clockwise, from top, blocks 12, 11, 10 & 9

block 13, day 13

block 14, day 14

So right now, maybe you're asking yourself, 'How does she DO it, how does she balance ALL THOSE PROJECTS"??????

Well.  I juggle a lot.  A LOT.  But it IS fun to have things in various states, so that if you feel like piecing, you have some piecing.  If you feel like quilting, you have a top to quilt.  If you want to cut, you can do some cutting.  It can't bother you to have a lot of stuff in progress.  You have to be good with that.  You decide what MUST be done by the 15th, say that quilt you are taking to a shower.  But other stuff may not be completed for a long time.  And that's OK.  and I'm always, always, finishing things.

SO,  you MUST stay organized!!  Everything you need for a project has stay together.  Like thus.


I just freed up this basket from the Coffee Cup Photo Quilt, so I decided to put everything for the #100Days100Blocks in here.  I often use the 12" stackable plastic totes, but didn't have one free.  Plus, I am getting this out every day.   In it is:  the book, which I need for the patterns; the fabrics I pulled, shot cottons in blues, greens, fuschia & a titch (technical term) of lime;  scraps in a ziplock bag (cuz I will use those scraps as I go); the blocks are in a zippered 8 1/2" by 11" clear office pouch from The Container Store.  Bought a pack, just KNEW I'd find a perfect use.

Personally, I must try to stay as tidy as I can.  If I go in the studio, and it's a mess, I just cannot function.  Don't want to.  Might turn & leave.  Too much=TOO MUCH.  So I try to straighten up, often.  But it's not easy.  I have a LOT of stuff, as maybe you do too.  And I have extra in my room because we are doing some re-modeling in the basement, after having it waterproofed, so I had to have stuff I normally store downstairs, UPstairs, in the studio.  Ugh.

I've learned that enough once it becomes a  quilt top & goes on a hanger, pin to it your info, maybe you drew out the backing or other info.  Put the backing fabric on the hanger, put the binding fabric there.  If you pull it out two years later, you might think-----I bought the PERFECT binding fabric for that, where did it go?  If it's on the hanger with it, you're good to pick up & move forward.

Being organized is a lifesaver.  For me, it is necessary.  We all have our OWN comfort levels for how messy our work-space can be, so ask yourself---do you know what this level is for you?  If you can work with a lot of stuff out, that's fine.  But if you're avoiding your room, maybe it's because you're like me.  Then.... CLEAN. IT. UP.


 (photo found on Pinterest, and God help me, I found a WHOLE fun page of squirrels.....)


Oh, yeah----NEW projects! Project ONE

I've changed so much the last few years----now I MUST have handwork!  All the time.  So I already ordered another new Sue Daley pattern (her website is down right now, but it's www.suedaleydesigns.com).  Her work is fabulous---as I've said before, what are they putting in the water those Australian quilters are drinking, anyway!  I want some!  Such incredible work coming from there, the patterns, books & fabric are just beyond excited belief.

Instagram can be a dangerous thing, I'm just saying.  The inspiration is amazing, the quilters there are fabulous.  It's the best, most supportive quilting community.  But you see NEW things all the time, things you MUST do, must join in on!  Which led to my two new projects.....


Check out this blogpost on July 31, Sharon of Lilabelllane, does fabulous work, you should be reading her blog anyway!  She posted a picture on her Instagram account & I commented to ask her how long it had taken her to get as far as she had, which was probably 2/3 of the above-----6 weeks!!  SIX WEEKS!  Does this woman sleep????  I think not. (disclaimer---I LOVE her.  I want to BE her).


So that's it, that's all I need.  Just 100 of those on the top, and 81 of the ones on the bottom.  Easy peasy, right?  Six weeks??  I think not!  But we'll see.   They always say the squirrel is mightier than the sword!!   I just have a couple done so far, they are smaller than I thought, just maybe 6".  I'm using a bunch of Jen Kingwell fabrics.


QUATRO COLOR QUILT STATUS:  those 2 blocks, some cut, more cutting going on, see below.  Super scrappy, not yet sure what my backgrounds will be.  Love the black out to grey, but lots of possibilities.  Like Scarlet O'Hara always said (and I'm fond of repeating), "I'll think about that tomorrow.  Because, after all, tomorrow is another day"!! (Said, of course, with a southern accent)


Second project, NEXT POST. 

Progress on some hand-stitching

Since Grand Rapids AQS, I've been sewing like crazy.  There are so many nuts in the air that even I'M feeling a little overwhelmed!!  What IS this creative flurry!!  So grab a cup of coffee, and sit down for a spell, you needed a break anyway.

I pulled out two UFO's, a large floral project from a workshop with Melinda Bula started last summer, and a photo-to-quilt project started with David Taylor in 2012.  I'd been dreaming of sitting and hand-appliqueing that photo quilt, since I am really enjoying handwork now.  It's great when Mike and I are sitting watching TV together in the evening, as well as other times.

The Melinda Bula is a Hibiscus, and there are still LOTS of little parts to cut out.  Her work is fabulous, if you're not familiar, go to her page (I linked it above) & look at some of her prize-winning quilts.  BUT.  The thing I don't like about my kit is:   A. the fusible web.  I'm not opposed & often love using fusible.  But this much is a LOT.  I have to clean off my scissors with rubbing alcohol every so often.  And B.  the long skinny pieces, with teeny turns and knobs.  Is that really necessary??  You can admire & enjoy someone's work, try their technique, but know it's not for you.  I do want to finish it though.


HIBISCUS STATUS:    Still cutting!


My David Taylor project, the 'coffee cup', started in 2012 at a 3-day workshop, is a still-life in blues & greens.  Brought it home, worked on it a little, then put it in a pretty basket, and it sat.

Spring of 2015, I took a 2nd class with David, a short-one-day, so I could refresh myself on how he creates his pieces & his applique.  Came out, got the project out, finished prepping the rest of the pieces (a good amount had been done in the workshop)

A pattern had been created from a blown up photograph in class, and the way he does this is fascinating!  Let me tell you, that class scared the beejeezus out of me----got in there the first day and thought, oh man, this is so over my head!  What am I doing here???  But it feels good as you get going to stretch yourself, even if it's scary at first.

His pattern shapes are often ying-yang, tear drops, that interlock.  Let the fabric do the work, he says.  Maybe half of my pieces were ready during the workshop, so the rest I did last summer, intending it to be ready for applique September 2015.  Got it back out two weeks ago, pieced my background, and started laying out the pieces.  You put the translucent pattern over the top to help you lay out the pieces where they belong, like so:

Cool, huh??????
So I was right about September target date, just got the year wrong, LOL.  It will be all appliqued September 2016, ready for quilting!

COFFEE CUP STATUS:  Getting hand-appliqued in the evenings.  Probably 50% stitched.


My English Paper Piecing project started last October has all blocks and handwork DONE.   All 16 blocks have been paper-pieced & hand appliqued down onto their backgrounds.   Those little 4-petal flowers that go between the blocks (see pic below) are all ready too.  I thought of this as a long-term project (several years?) but am very pleased it has moved along so quickly.


Here are my blocks on the design wall, with one sample petal-cluster pinned to the wall.  I haven't figured out yet if I can whip stitch the 4 together first, then applique down to the completed top, or if they need to be attached separately. Thoughts????


Pardon the wrinkles, but as much as you smooth the blocks to the flannel design wall, it's still not very smooth & the camera can be very unforgiving.  They are lovely, and the soft grey backgrounds look very nice.


Well I WAS going to tell you about my new projects, but I sense you're getting a little twitchy, just sitting there, and need to go do something---probably sew!  So my new projects will wait til next post.  Til then, GO SEW!


Friday, August 19, 2016

Cross-Cut Quiltalong

So the project I just HAD to join in on a couple of weeks ago was quick & easy.  I was johnny-come-lately to the quiltalong, which the others did over the week of July 25.  It was hosted by Debbie, at a Quilter's Table, and today she has a blog post showing more of the finished quilts, including mine, so you can give her a vist if you'd like, by clicking on that link!  I decided to do one about the time they were finishing, after seeing lots of photos on Instagram,  the project looked so intriguing & fun---and it was! 

Suggested were low volume backgrounds & contrasting strips.  I decided to use soft greys for the backgrounds, I cut out NINE of those at  9 1/2", then I went to my bin of 1 1/2" strips to pull some purples, blues & a tiny splash of lime green.  Those were trimmed down to 1" strips.  If I had some I really wanted to use but they weren't long enough, I sewed them together with a straight seam, and pressed it open.  Cuz scrappy is good, and once it's in that bin, it's FREE, right? And we love to use those little bits sometimes!


Once your strips & squares are ready, you are going to cut all nine of the 9.5" squares in half, on the diagonal.  THEN, you really, really want one of THESE tools (below), which I ran out to Christina's Quilt Shop in Rochester to get.  I had read about them in a quilting mag when they came out & wondered, hmmm, do they work?  My friend Suzanne had gotten one & I was able to try it out at a sewing day recently and LOVED it!  It's THE STRIP STICK, and it's purpose is ironing seams OPEN,  but is also useful to ironing seams to the SIDE, as quilters most often do.  The advantage to having seams OPEN is that your piece is then very, very, FLAT, and sometimes you really want this look in your piecing.  If you are going to use stitch-in the ditch quilting, you don't want open seams, but I had no plans of doing that with this small quilt.


How & why does this work, you ask?  I think it's because your seam is elevated & you are pressing just the seam, not the rest of your block, or piece.  The Seam Stick is rounded, and your seam is in the air, just the seam,  as you press.  Have you ever distorted your work with pressing?  Well I sure have, not that I am proud of that fact, but it HAPPENS, even without using steam.  And when you are using 1" strips, that will finish at a mere 1/2" wide, and everything must be STRAIGHT, that cannot be allowed to happen.

Now, I am sorry for using all the shouty capital letters, but----wait, no, I'm NOT sorry.  I tend to be emphatic when excited & I just cannot apologize for that.  It's just the way I am.

Once your squares are cut on the diagonal, you are going to sew a strip along the center edge, then join the other HST to it.  Press your seams open, then cut your new square in half the OTHER way, and add a strip to that, like so!


The Seam Stick made my strips a thing of beauty! Just look at the back!  They come in THREE different sizes: the 'mini' is 9.5", about $9.00, the 18.5" about $11.00 (I bought both), and I think the 3rd size is about 24.5", and I'm not sure the price on that.  Once you use it for open seams, you will never be without it again!  After I told some friends, they all had to get it & found them at AQS Grand Rapids at a vendor's booth.  If you are local, go to Christina's in Rochester, Michigan, and tell her 'Sue sent me".


When the nine blocks are all done, square them up to 9.5", if you can.  That size is not crucial, and I had to go 9" or 9.25" myself.  If you can go 9.5" on all, that gives you a little more cutting possibility shortly.  

Put them up on the design wall, and see how they look.  Move them around to make the lines & colors do something you are pleased with.  You can photograph each arrangement if you want to, to help you decide.  Aren't they pretty???  Don't you just LOVE that some of the strips are pieced??


Now, sew them all together!  Press your seams open again. you still want everything nice & flat.

Now, what are we?  Quilters, right?  What do we do?  We cut up stuff that is already in one piece & then we sew it back together again, right?  It's what we dream of at night, it's what we live for!  You have made a piece of fabric, and, beautiful though it is, we are going to cut it apart, and put it back together again!  Don't be scared, it's going to be F.U.N. fun!

Now need a smaller square, I used my 6.5" square ruler.  You could go 4.5" if you wanted to, it doesn't matter.  My goal & instructions in this QAL were to get at least sixteen squares cut out of that fabric we made.   If you cut them smaller you would want more.

So take your 6.5" ruler and start cutting on that fabric we just pieced.  I didn't have a lot of lee-way, so I pretty much laid it down in rows and cut out my 16 new 6.5" squares.  And put them up randomly on the design wall.


Play around til you like what you see, or just go totally random, it's up to you!  I had very little of the lime green, so I wanted it to position it to go across the quilt in a particular way.

Sew your squares together, press your seams open again, and then you are ready to layer up for quilting.  I quilted a wavy grid, which I am totally in love with lately!  Such fun, soft movement, and you can do it small or big.  I felt it worked really well with all those lines & graphic quality of the piece.

My quilt finished just shy of 24", after quilting and binding.


Even when our deadlines are self-imposed, fun projects, we still get into that mode of "well I have to do this first" or "I have to finish that".  Sometimes you have to clear it all away, and just PLAY!

So today, now, I am giving you permission to GO to your sewing room or studio, and PLAY.  Have fun, because you DESERVE IT!


Sunday, August 14, 2016

AQS Grand Rapids 2016

First off, no, I can't yet show you the little project I started last time.  But I will soon, I promise.

I just had one of the best weeks EVER.  Since AQS began having shows in Grand Rapids, Michigan I have been fortunate to go with a group of friends, usually 5 or 6 of us go.  We spend the entire week, arriving the day before the show opens on Wednesday, going home Saturday.  Shopping the vendors, looking at quilts, attending lectures & classes, and meeting up with lots of friends from the quilting world, our world.

This year was special because I had three quilts in the show.  Three.  Can you imagine how blessed I felt?  And nervous?  To have some of your quilts hanging, displayed on black, at a national show.  Among your peers.  Among work you can never, ever match.  Incredible breathtaking work.  Putting yourself OUT there is scary.  It took me two days to be able to hang out occasionally near my quilts, afraid I might hear someone say something, but what an amazing KICK it was to see people go close to look, to linger sometimes and take photographs!!  Yes, I am insecure, thank you very much.

One was part of a guild challenge exhibit with Great Lakes Heritage Quilters, first time ever that our 24-year-old guild has had such an exhibit at a national show.  I am so proud of GLHQ!  Our theme was 'text' or words.  The quilts had to have words, and had to finish at 30" by 40".  We had 8 lovely quilts hanging and our name on a placket.  BUT, AQS kinda screwed up this year by NOT putting individual cards by the quilts to identify their maker & name.  So feeling gypped for some of us who have never had a quilt hanging at AQS before.  Some maybe never again, because they just don't enter shows.  So this was very exciting for us as a guild, and I felt so proud that we were represented.  GLHQ has a lot of talent.  (One of our younger members, Ruth, won a 2nd place ribbon for a quilt she entered solo, not this exhibit.  I believe the modern wall-hanging category, so huge congrats to her!)


Mine in the GLHQ Guild Challenge group is below.  I sure wish they had steamed a little, as they said they would, because the fold lines from shipping were very apparent.  Sorry about that!


Normally, when the show opens, we get right to shopping, as items do run out, as the quilts will be there all week.  So we may not even LOOK at quilts til Thursday, or even Friday.  This year we went directly to the quilts, guild exhibit first.  My friends were sweet & awesome, they made much of it & I felt like papparazzi were taking my photo in front of each of my quilts.  BIG thank you to Joyce, Diane, Phyllis & Linda-----thank you so much for your love & support--you made me feel so special!

The next quilt was at spot 106, and you could see it hanging while standing in the aisle of the guild display, which was kind of fun.  I LOVE this one---everything about it.  The colors, the quilting, the fabrics!  Ohhhh-----and it's going on to the AQS show in Des Moines!!!  That show is October 5-8, 2016.

Wonky Baskets (started after a Gwen Marston workshop)
Seven Point Two (spiral quilted, pattern by Rossie Hutchinson)
What's on my foot, you say?  Broke my baby toe 3 weeks before the show.  Still couldn't get a shoe on it, so had to wear this velcro thing.  I could walk OK, but can't yet get a regular shoe on it.  It did cramp my style a bit, slowed me down, but when you're there all week, this works out OK, because you can take your time & pace yourself.

Huge thank you to my good friends MARIE, and Pam, from Detroit Area Modern Quilt Guild.  They requested I show them each of mine personally, and Marie took photos of me & each, and posted them on Instagram.  Love you, Marie!

I felt so much love & support from my GLHQ friends, and DAMQG friends, who came up to me at the show and congratulated me and hugged me----again, the love & support of friends is a wonderful thing, and I thank you all, even if I didn't name you here.  I think of each & every one of you, your face & name, in my heart.  Thank you.

Lastly, my beloved eldest, Katie, who, after I sent her a photo of me in front of a quilt, posted it on Facebook & said how proud she was of her mom, having quilts in a national show.  Katie is a writer, as you know, and respects that her mom is an artist too.  Love you, sweetie!

To get quilts in, amidst a LOT of competition, was amazing & I wore my 'contestant' ribbon with great pride.  Thank you everyone for love & support, and what amazing memories I will hold close to my heart, for a long, long time.


Friday, August 5, 2016

What I'm Doing Right Now (#WIDRN)

Been far too busy this summer to update this blog.  Enjoying summer.  Going Up North.  Breaking my baby toe.  Working on five different projects.  And I have had a HUGE outbreak the last few days of "Look There's a Squirrel" Fever!  Here's some proof:

Just this morning, I HAD to cut out 9 - 9.5" squares of background grey for a small quilt that some quilters did as a challenge on Instagram.  It's the crosscut quilt challenge, which they did last week.  Yes, that's right.  LAST week.  I think I have to jump on board.  Now.  Right this minute. 

More on that at a later date.

Then, I offer you a glimpse of my design wall.  I'm sorry it's not a better pic, but morning light is not kind to my studio, it's a bit dim. And I could have smoothed those blocks onto the flannel a little more, but who has TIME for that!  So.  It is what it is.


These two things are moving right along.  One, the small one (bottom left), is from a kit recreating an antique baby quilt that I bought a few years ago. Got going on that again last week, and it's going to be really cute.  The other is the EPP project I started last year, in late October.  I am zipping along, only need to piece TWO more blocks, and applique those plus 4 more onto their background squares.  Then, some cute little clusters of four petal shapes get sewn together, and attached in each corner where four blocks meet.

So, that's what I've got right now (plus two more quilt tops I finished recently, one is 60 X 75", the other is 50" X 75".   PLUS a LARGE 90" square top is being dropped off to one of my favorite long-arm quilters today.  I sure don't want to put that puppy under my own needle for quilting!  And no, you don't get to see those just yet.

Gotta run----those 9/5" squares are calling!!  And have to start packing for Grand Rapids AQS--leaving on Tuesday, won't be back til Saturday!  But before I go, here's a squirrel, since I'm having lots of those squirrel moments this week---'squirrel flash', like a hot flash----because

Quilting is my SUPER POWER!