Just how do paper-piecing & plastic sheets go together, you ask?? They are the two things I am doing lately.
Wrapping everything in the basement in plastic. Getting ready for waterproofing work to start on June 6. We had a room in the basement torn down & removed. There will be jack-hammering, trenching, then new drainage pipes, crushed rock & concrete. After the pain of that is over, un-plastic-ing, maybe some prettying up in my basement, the first we've ever done, then trying to get things back in reasonable place.
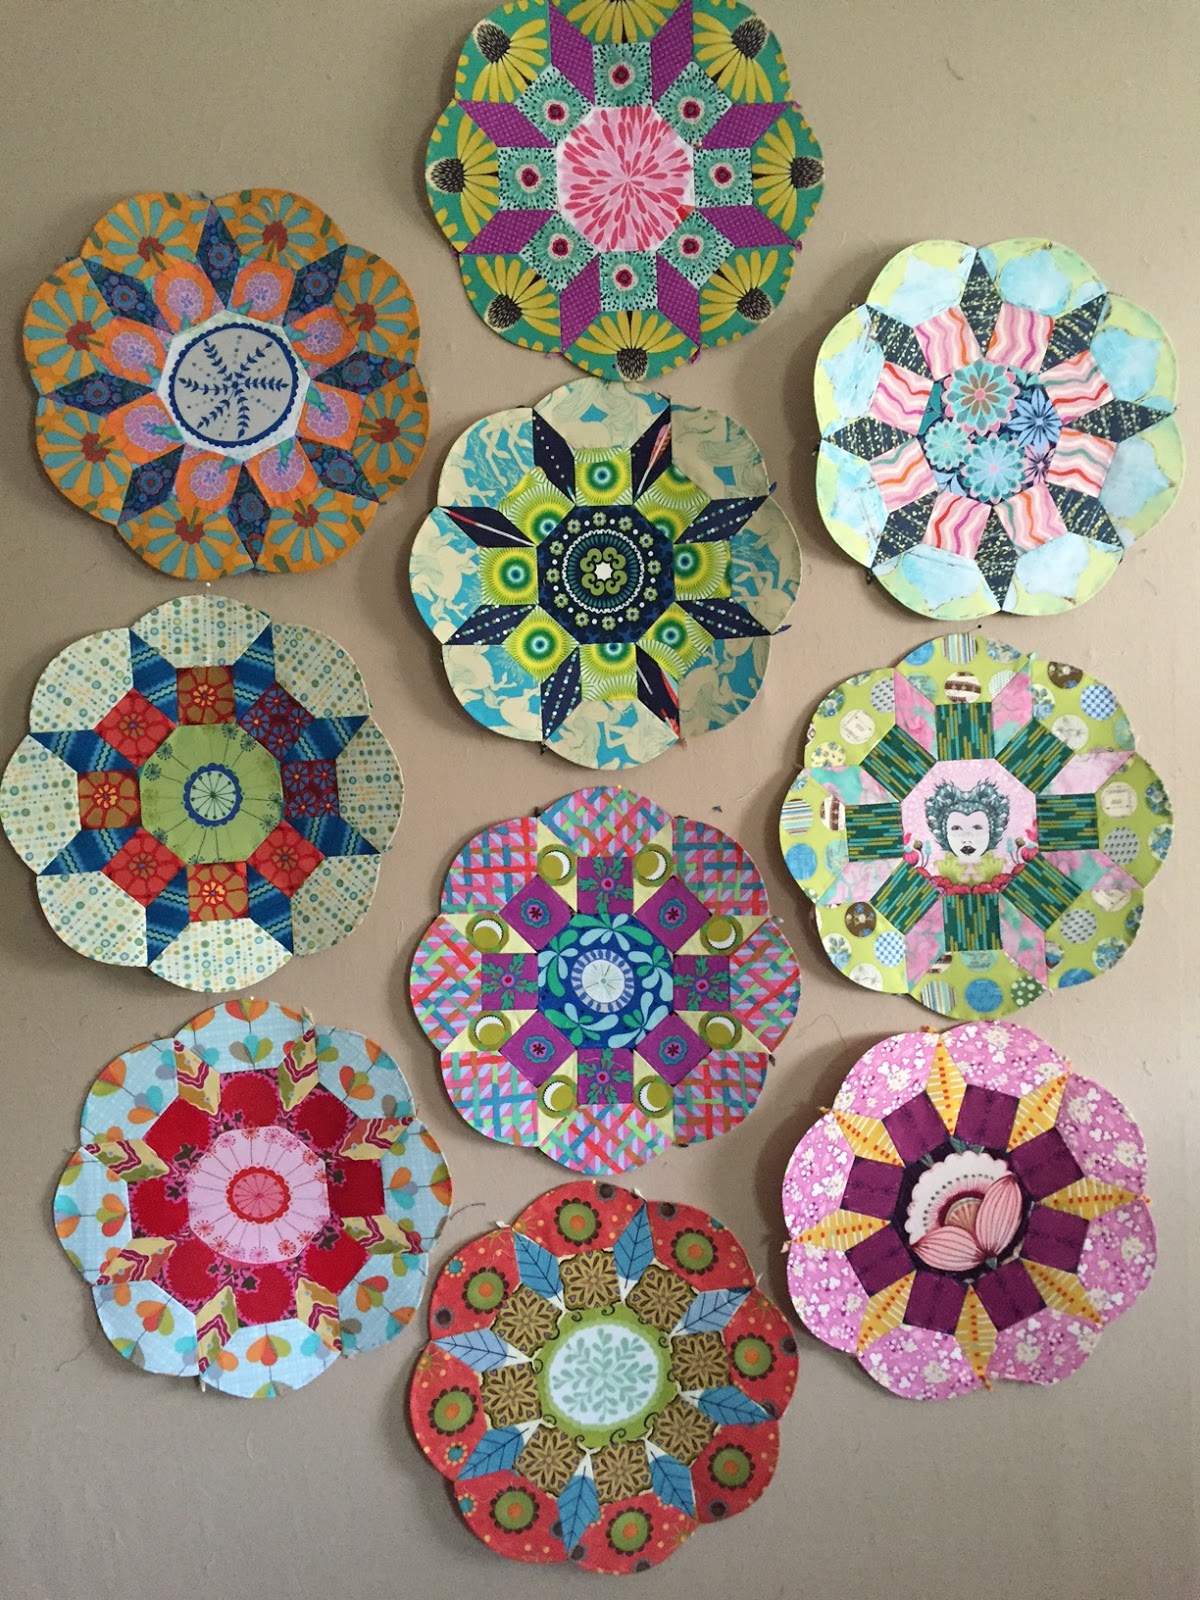
English Paper-Piecing is such nice sit-down/TV work, so I've been working on on my Fruit Tingles quilt, pattern by the wonderful Sue Daley of Australia. Below are my three newest blocks.
As I pull fabrics & cut out, doing usually two at a time, it's helpful to see how my colors are looking, what's needed next. I didn't being with a complete pull to work from, just really didn't want to have another basket of fabric set aside for the project. They usually sit so long! So I'm pulling as I go, but the fabrics have to coordinate with the centers, which are all cut.
It's helpful to get it out & put on the wall, to see how it's looking, so I put them up on my design wall. Which I FINALLY got free from the Japanese Puzzle quilt that's been on the wall for maybe 2 months, little bits of numbered paper pinned to each one, what a PITA it was becoming! No, not bread. Pain in the-----. It's been tying up my wall for too long, and since the deadline is approaching, at the urging of friends to finish it, I did. But it's for a guild challenge and the reveal is our end of the year meeting June 9, so no pics of that yet. Here's my blocks so far.
The kit doesn't come with enough paper to do all 16 blocks, so soon I have to audition & pick my background fabrics, and get a few appliqued down to free up some papers. I'm thinking soft grey background fabrics, maybe 4 different ones. Then there are some really cute petal shapes, round on one end, coming to a point on the other. They are joined in clusters of 4, and go in the corners where 4 blocks meet. Not sure yet what color those will be, but it will be one fabric & color to unify the scrappiness of the blocks.
Also packing up for Glamp and some wonderful teachers that I am really looking forward to meeting: Carolyn Friedlander, Elizabeth Hartman, Happy Zombie ( Monica Solorio-Snow), Rashida Coleman Hale, Violet Craft & Penny Layman.
thoughts on quilting and the creative process, or, how the 'look---there's a squirrel!' approach to quilting works for me
Tuesday, May 31, 2016
Wednesday, May 4, 2016
Beautiful Vintage Circa 1920
Don't know how YOU'RE doing, but not too much sewing going on in my house right now. We're getting ready for basement waterproofing, and doing lots of sorting, getting rid of, and packing up. I 'm really happy if I can get my two Splendid Sampler blocks done each week!
During this process, I was looking at this old quilt I have---too young to be 'antique', so it's 'collectible' or 'vintage'. It's the very FIRST one I ever bought, not that I have many. Maybe 6 or 8, and most are close to being what people would call a 'cutter quilt'. The kind people used in their attics as dust covers, or their trucks for moving things. Really, really worn.
This one I bought in Shipshewana, Indiana, I think it was the early 1990's. It was one of my FIRST girl-road-trips, which were a total revelation to me! Who knew that the point wasn't just getting from point A to point B in record time? Who knew you could stop & browse an antique store if you wanted to? I had no idea! I still remember a later trip, going to Quilt Festival in Chicago---it took us 6 hours to gt across the state! (It's a 3-hour drive). LIFE's a journey, my friend, and it's allllll about the ride! Wait---a minute ago, when I said 3-hour drive, did you, in your head, start humming "a 3-hour tour, a 3-hour tour'? Or was that just me??? If you didn't get that, you're too young.
A group of friends in my neighborhood did an annual trip to Shipshewana in November, when things were decorated for Christmas, which then led to a summer trip to Shipshewana for the huge Flea Market they have there. My first flea market ever! It was hot, so hot. We had coolers in the car with water bottles on ice, and parked as close as we could. It was really fun! Foot sore, hot, but fun. And I found...... THIS!
It was cheap----maybe $35 or 40. Wish I had written that down, and the date, but I didn't. It's not a fine quilt. It's not hand quilted. It's machine-quilted. It had been used, lived a life. It spoke to me---the colors, the simplicity, the fact that it WAS done by machine! The striped fabric seems to be dish cloth, kind of waffley, if you look at the close up. That dark stitching thru the yellow sashing is a zig-zag stitch. It's navy (not black), with the pink and yellow, and some white. Wonky! Weird! I loved it! I was so thrilled to take it home, my FIRST vintage quilt!! The back is white, and brought to the front, turned down & stitched to bind it.
Some years after that, maybe 5, we became aware of the Michigan Quilt Index project. We had an amazing quilt collector & historian living in the area, and she was a member of our guild, Mary Silber. A friend of mine, also a Mary, had made a beautiful Lone Star Quilt, I think it was all hand-quilted, and she wanted to have it appraised & registered in the project. We were being urged to register all of our quilts, so that their history would not be forgotten. So I went with Mary, and took my funny little quilt along for Mary Silber to take a look at for me & tell me anything she could figure out about it. I recently looked it up on the quilt index, as I couldn't remember when it was from, or the name of the pattern. THEN, while cleaning the basement, I found notes I had written from that day! Tucked safely into a folder of "QUILTY STUFF" (**important note here---'a safe place' isn't ALWAYS throwing something into the abyss of the great unknown--sometimes you can actually find it again!!!)
So here's what Mary had to say about it: This quilt was probably made in Pennsylvania, around 1920 (between 1901 & 1929). It is a Monkey Wrench Variation. It was hand-pieced, and machine quilted on a treadle machine! How cool is that???!! Mary said its value at that time was $375, and replacement value would be $750. She also said I could wash it in a tub, or by machine, on delicate, with a delicate soap. Air-dry, or dryer on cool. Important to note that is a quilt that was USED, not tucked away in a trunk. So it had been washed before.
I still love it. When I look at it, it makes me happy. It tells me important things about myself from the perspective of twenty-some years later. Some of those things should have been clear, but maybe weren't altogether. First, I love using my machine (OK--clear to me, never lost sight of that, no fuzziness there!). Machine quilting is awesome! (never lost sight of that either). I guess the only thing I lost sight of for awhile, in my brown, muddy phase, was that I LOVE COLOR! I love simple patterns, simple shapes. I can look at an intricately pieced quilt, a Baltimore Album, an incredible landscape or art quilt and admire & appreciate the skill & beauty of those quilts. But they do not speak to my heart. They do not GRAB me by my soul. They just don't.
Beautiful fabrics. Simple designs. Those things speak to me. Those are what I want to make, and need to make.
Sunday, April 24, 2016
QUILTER TO QUILTER SALE
My larger guild, Great Lakes Heritage Quilters, held it's FIRST Quilter to Quilter Sale! Very exciting concept, this idea was initiated by my friend Diane, who is a current board member. Similar to a Moms to Moms Sale, which she has often gone to with one of her daughters, we had anything a quilter wanted to de-stash, or found they didn't use, etc. Gently used or new. We had everything from fabric to sewing machines, and everything inbetween. Beautiful antique quilts, tops, blocks, quilting hoops on floor stands, a Serger, a Tutto case! Buttons, batting, books!
We had a great location, a church in Troy, who was absolutely wonderful at helping us out, and we used their beautiful new-looking gymnasium, on a main floor, no steps. It was light and airy, with plenty of room. Large items were in a separate room, right near.
We set up the day before, between 4pm and 8pm, so that those who worked, could also get set up with ample time. The church supplied some carts and also a strong young man or two to help people get their things in during set-up.
We probably didn't have as many vendors as we would have liked, but watch out world---that won't be true next time! We had quilters from far and near, and they were waiting outside before the opening time. Us vendors had an opportunity to buy from each other the hour before the same opened, which we did.
Some thought it was silly to buy---object was to sell, not buy! Make more space, de-stash. I say, if you found NEW stuff you wanted (and prices were often VERY cheap!), why not trade up to some NEW things you DID want?
It was a very fun day, and mark my words, this event WILL happen again, and it will be LARGER next time--more vendors, more stuff.
But shoppers---next time remember to be ready to buy the large items, which were seriously overlooked. There were some amazing deals on larger things, and no one seemed to take advantage of those.
We had a great location, a church in Troy, who was absolutely wonderful at helping us out, and we used their beautiful new-looking gymnasium, on a main floor, no steps. It was light and airy, with plenty of room. Large items were in a separate room, right near.
We set up the day before, between 4pm and 8pm, so that those who worked, could also get set up with ample time. The church supplied some carts and also a strong young man or two to help people get their things in during set-up.
We probably didn't have as many vendors as we would have liked, but watch out world---that won't be true next time! We had quilters from far and near, and they were waiting outside before the opening time. Us vendors had an opportunity to buy from each other the hour before the same opened, which we did.
Some thought it was silly to buy---object was to sell, not buy! Make more space, de-stash. I say, if you found NEW stuff you wanted (and prices were often VERY cheap!), why not trade up to some NEW things you DID want?
| Here's someone still setting up |
| This one had an amazing THREE tables full of fabric, all divided by color |
| My friend Carol had these AMAZING shirt fabrics that she had bought, washed, ironed & cut up---the work all done for us! |
| Serious yardage |
It was a very fun day, and mark my words, this event WILL happen again, and it will be LARGER next time--more vendors, more stuff.
But shoppers---next time remember to be ready to buy the large items, which were seriously overlooked. There were some amazing deals on larger things, and no one seemed to take advantage of those.
| Panoramic of the sale, with some shoppers |
Wednesday, April 6, 2016
Quick & Easy Must Have Item!
For awhile now, I've been thinking of making one of those portable pressing tables some of my friends have, you know---you take a wooden tray table and cover it? The great thing about it is, even when you are sewing in a crowded situation, like retreat or a workshop, there always seems to be space to use this. My friend Vicky & Marie both have them, with really cute covers, and they put them to their left when sitting at a 6 foot table, making your space into an "L".
Another friend, Rebecca, mentioned she had several she had gotten really cheap at a garage sale, as a set, and offered me one-----shout out to her! It's great to have friends, isn't it? (You could also find one at Target or Meijer, for about $10). And I must mention here that it needs to be made of WOOD, so you can staple into it. So last night at guild, I got the table from her, and have managed to get it covered very quickly, from my well-supplied quilting studio, just this morning!
Here's what I did:
Measure the top of the tray table, mine was 14.5" by 19". (and about 1/2" thick)
Cut one piece of Insul-Bright the exact size of the top, and also one piece of cotton batting (leftovers from quilt tops are wonderful to have). BOTH are exact size to cover just the top of the tray table.
Cut fabric top about 3"-4" larger on top & side to allow for pulling that fabric only to the back. For mine, that rounded off to 18" X 22". You can run out & buy something cute, a printed canvas or home dec fabric would be great, but I used what I had on hand, a fabric I love, green with some blue that friends put on the back of my 'big birthday' quilt.
Layer first with the Insul Bright goes (next to the wood), then the batting, then the printed fabric. Many of us like a firmer surface for pressing, so this works great. If you like, add another layer of batting now, for a softer surface. Turn this pile upside down on the floor, the fabric next to the floor, then put your opened tray table on top it, making sure the cushy part is evenly covering the wood, and you have about 2" of fabric along each side to pull to the back.
Load up your staple gun & if it has a tension adjustment, it has to go to 'strong' if you tray table is oak like mine was---oak is a very hard wood. Then pull gently taut on a long side, stapling about 3-4" apart. Next, the opposite side. Then, the ends, pulling and tucking around the ends.
Voila!!! Here is is, ready to go!
One of the great things about having a staple gun for projects like this is that when the cover gets dingy looking, as it will with a lot of use, you can easily remove just that fabric covering & re-cover it, all fresh and new!
So, easy peasy, I now have portable extra space. I can press on it, or add a cutting board and do smaller trimming. Or whatever I want!
Meanwhile, I'm supposed to be getting packed right now to go on a quilter-girls weekend Up North. Can't wait! But had better get on to the packing. Isn't planning projects to take always the hardest thing???? That's where most of my time has gone the last two days, and my project STILL isn't ready! Best I get back to it.....
Wednesday, March 30, 2016
P.S. SEW-JO UPDATE!
3pm breaking news----it appears to be back, as my GLHQ Challenge quilt is all cut and partially sewn! The bad news is....didn't go to the gym, walk on the treadmill or get dressed yet today! And if I don't go to the grocery store now, my husband will have no yogurt in the morning!!
SEW-JO
Sew Jo. You gotta have it. But what if it goes missing? What do you do? Panic! Oh no! How do I get my SEW-JO back???
It's magical, it's elusive sometimes. SEW-JO. It's the making-it magic for quilters! But every now and then it falters. Why? Why does that happen? I don't know. I think, sometimes, for me (maybe not for you), it's something sitting there waiting that you don't really want to work on, but have to. Or feel you have to.
I've been suffering a mis-fire on my sew-jo. Not for a long time. But I sew a lot, so if it goes missing for just a few days, I wonder what the heck is wrong with me? I decided that this time it IS caused by the project under my needle. My Wild and Free Applique quilt from my workshop with Pat Sloan. I really, REALLY, want to have it done by guild meeting, 2nd Thursday of April. I like it, yes, but discovered once I started quilting it that I wasn't really confident with HOW I was quilting it, and that caused my beloved SEW-JO to slip town for a few.
To jump start it, I went into my sewing room this weekend, reluctantly, feet dragging. Decided to do a little string piecing. Every since two classes I took this summer on string piecing, I have been keeping a box of little pieces, just for string-piecing. So I got that out and spent a little time joining them together. Pressed them. And FLED.
Today I went back in, boldly and unafraid. I was going to take those string-pieced thingies and make a pillow cover for my living room chair, damn it! In quick-time, so I could then walk on the treadmill, and maybe go to the gym!
So I did.
Is SEW-JO back? I don't know, but I think a kick-start of something easy and no-pressure is helpful.
I'll keep you posted.....
Subscribe to:
Posts (Atom)